
So you’ve got a leaky pipe, someone told you to grab some plumbers tape from the hardware store, and now you’re wondering why it’s not working like it does in the YouTube videos. Yeah, I’ve been there too. Turns out there’s actually a right way to do this thing.
Key takeaways
Here’s what I wish someone had told me the first time:
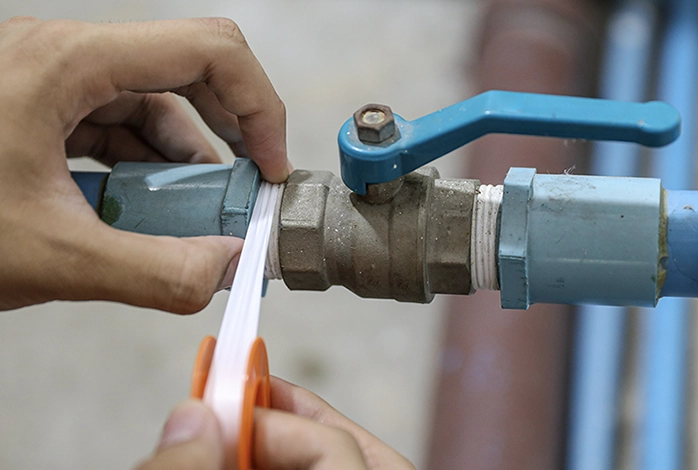
- Start with clean threads. I know it seems obvious, but wipe off any old tape or gunk first. New tape doesn’t stick well to dirty threads.
- Wrap it clockwise. This is the big one that trips people up. When you’re looking at the end of the pipe, wrap the tape in the same direction you’ll be turning the fitting (clockwise). If you wrap it backwards, the tape will just bunch up when you tighten everything.
- Don’t go crazy with it. Three or four wraps is usually plenty. You should still be able to see the thread pattern through the tape.
- Keep some tension on the tape as you wrap so it stretches slightly and really gets into the threads.
What is plumbers tape?
Plumbers tape is a thin, white, stretchy tape that wraps around pipe threads to create a perfect seal. Basically, it fills in the tiny gaps between pipe threads so water can’t sneak through. It’s technically called “PTFE tape,” but most people just call it plumbers tape or Teflon tape.
Step-by-step guide on how to apply plumbing tape
Clean the threads
Start with clean, dry pipe threads. Wipe away any old tape, dirt, or debris with a rag. You want a fresh surface for the best seal.
Find your starting point
Hold the pipe so the threads are facing you. You’ll want to start wrapping at the base of the threads (closest to the pipe body).
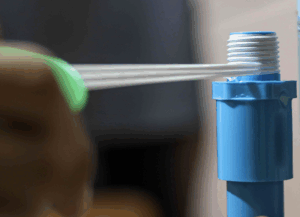
 Wrap in the right direction
Here’s the key: always wrap clockwise when looking at the end of the pipe. This is crucial! When you screw the fitting on (also clockwise), the tape will tighten rather than bunch up or unravel.
Apply the right amount
- Start with moderate tension (you want the tape to stretch slightly)
- Wrap 3-4 times around the threads
- Each wrap should overlap the previous one by about half the tape width
- More isn’t always better (too much tape can actually crack fittings)
Finish, clean, connect
End your wrapping near where you started, and smooth down any loose edges. The tape should lie flat against the threads. Once you’ve applied the tape, thread the connection together right away. Don’t let it sit around, or it’ll lose its adhesiveness.
Where plumbers tape works… and where it doesn’t
This stuff works great on standard threaded pipe connections. Think things like shower arms, toilet supply lines, or garden hose connections. But don’t use it on compression fittings (those are the ones with the little brass rings) or anywhere there’s already a rubber gasket. Those are designed to seal without tape, and adding it can actually cause problems.
Common mistakes when applying plumbers tape
The biggest mistake people make is wrapping the tape in the wrong direction. When you wrap backwards, the tape unravels as you tighten the fitting, which defeats the whole purpose.
Another thing: if you’re still getting leaks after taping, don’t just add more tape on top. Take it all off and start over. Sometimes the threads are just worn out or damaged, and no amount of tape will help.
Plus, teflon tape is cheap, so don’t try to save money by reusing old pieces. Fresh tape works better and isn’t worth the risk of a leak.
Final notes on how to use teflon tape
Last but not least, yellow teflon tape is strictly for gas. Don’t use white tape on natural gas lines. And if you’re working on anything related to your main water line or gas, probably call a plumber. Some things are worth paying someone else to do right.
Sometimes the tape just won’t cooperate, and sometimes pipes do things that don’t make any sense. When you hit that wall, it’s time to call a reliable plumbing company — dial 314-645-6350 to speak with our team!
Other Frequently Asked Questions (FAQs)
How does plumber’s tape work?
Plumber’s tape works by filling the microscopic gaps between pipe threads. When you wrap it around the male threads and screw the fitting together, the tape compresses into those tiny spaces, creating a seal that prevents water (or gas) from leaking through. The tape itself is made of PTFE (polytetrafluoroethylene), which is slippery and non-reactive, so it also acts as a lubricant that makes it easier to tighten the connection. The key is wrapping it in the right direction — always clockwise when you’re looking at the end of the pipe — so the tape tightens rather than bunches up when you screw the fitting on.
How many wraps of plumber’s tape should I use?
For most standard household plumbing connections, you’ll want to wrap the tape around the threads 4 to 6 times. Start at the base of the threads (closest to the pipe body), keep moderate tension so the tape stretches slightly and conforms to the threads, and work your way toward the end. Fewer wraps may not create a reliable seal, while too many wraps can make it hard to tighten the fitting and may actually cause leaks. End your wrapping near where you started and smooth down any loose edges before threading the fitting on.
How do I choose the right width and length of Teflon tape?
For most residential plumbing jobs, standard ½-inch-wide white PTFE tape is all you need — it’s the most common size and works well on typical household pipe threads. For larger pipe connections, a wider tape (¾-inch or 1-inch) can make the job easier by covering more surface area per wrap. When it comes to length, a standard roll is more than enough for multiple projects, so length is rarely a concern. The more important choice is color and type: use white tape for water supply lines, yellow tape for gas lines, and pink or green tape for specific applications like high-density or oxygen lines. When in doubt, check the label on the roll for its intended use.
Comments are closed